Thursday, November 24, 2011

Ukulele Build Part 13

The maple bindings did not turn out as well as I had hoped so the ukes went back onto the binding router and the maple was routed off and plastic bindings were added.  The necks were trued up and custom fitted to the bodies.  The instructions call for mounting the finger board to the neck and then fitting the neck to the body.  I figured that the finger boards would get in the way with fitting and finishing so I opted to leave them off at this point in time.  Ukes have nylon strings and short necks so I figure that there will be minimal stress on the necks and little back bow because of the little string stresses.  This means that the neck should be flat in relation to the tops of the uke body.  It is critical that the neck joint be perfect because the action of the uke (geometry of how the strings lie in relation to the fret board) depends upon this.  I used the trick of using double sided tape to fix sandpaper onto the body of the uke and ran the neck up and down this so that the exact shape of the body was cut into the neck joint surface.  A single dowel was drilled into the body and neck to help strengthen the joint.  Here is a photo of the glue up.
Here are the ukes after the glue up was done.  I used CA glue to put the bindings on which is why there is shellac on both bodies to prevent the CA from wicking up the grain and marring the finish (it is not a sunburst finish, although that is not a bad idea...).

Friday, November 18, 2011

Ukulele Build Part 12

Here is the jig that I built for routing the bindings for the uke.  It is made from a Stewart Mac router base and guide.  The dremel is mounted in the base and is supported on the back end to take some of the stress off of the router base.  The base and guide are bolted to an upright board and an adjustable support is bolted through a slot in the upright board.  The router guide (brass piece on top) controls the width of the route and the support (triangular maple piece) controls the depth.  The reason why something like this is needed is because the tops and backs of guitars and ukes do not make 90 degree angles with the sides.  Because of this you cannot simple set the router base on the top or bottom and route around the instrument.  You must use the side of the uke as the part that is supported for the cut.
Here is a photo of one of the ukes on the jig for routing.  The triangle supports the uke and the brass piece in this case is riding on the back of the uke and is contolling the depth of the cut.   One key here is to make multiple shallow passes to not over burden the bit and cause chatter or tear out.
 Here is a uke with the binding channels cut.
Here is the other uke with the maple binding glued in place with masking tape to hold it is place till dry.
 

Sunday, November 13, 2011

Ukulele Build Part 11

Here are photos of the linings for the two ukes.  The top photo shows the kit's lining system and the second is the one based upon a traditional guitar binding. 


The next two photos show the profiles of the linings for the ukes.  A piece of wood was made that had an arch cut into it that exactly matched the curve to the back piece for the uke.  When it was held up to the kit's linings it showed that they were so narrow that it made no difference if a bevel was sanded into the top of the linings or not.  However, a small gap can be seen on the wider traditional linings on the 002 uke as seen in the bottom photo.  Because the back would only be glued at the outside edge, the linings of the 002 were sanded to match the back's profile.
 Here is a photo of the 002 uke with the back glued on but not yet trimmed to size.
Here is a photo of the headstocks with the mother of pearl palm tree inlays after scaping them flush with the veneer.  As mentioned in the last post, you cannot see the router slip on the uke on the right because the epoxy mixed with wood dust hid it very well.  If you stare long enough you can notice an area where the grain looks a little different but that's about it (it is to the right, between the trunk and the lower most leaf).  These will have finish applied to tone up the wood color (the first coats of finish were used to fill the wood grain).

Friday, November 11, 2011

Ukulele Build Part 10

Linings were added to the top and bottom portions of the sides.  These linings increase the surface area for gluing the tops and bottom on to the uke.  The kit came with a set of thin basswood linings as shown on the left while I made more traditional "guitar style" linings for the 002 uke on the right.  We'll see which work out better on the final product.  I made a modification to the plans for the building jig by substituting a set of 1/2 inch dowels for the metal angle brackets.  This is much gentler on the side wood.
 Here is a photo of gluing on the tops for the ukes.  I used hide glue for this and really had to hustle to get the tops on before the glue started to gel.  It goes without saying but you need to do a dry run on each uke so there is no wasted time in the gluing process.  As you can see here, I have abandoned the metal brackets and added dowels to both jigs.  I think this is a better set up.
 Next the mother of pearl palm trees were added to the head stocks.  I used a glue stick to adhere the MOP to the head stock and then used an exacto knife to trace the outline of the palm trees.  Once the MOP was removed I added a little talcum powder as shown here.
 The talcum powder shows up the lines better so they are easier to follow when routing.
 Here is the start of the route.  Be careful not to let your attention stray for even one moment.  On the other head stock I looked up to see how the power cord on the router was laying and I neatly routed through the side of the palm tree trunk!  Not good, not good at all.  Fortunately there is a cheat fix that will work well so that only you and I, gentle reader, will know that the mistake is there...
 Add a little fine sanding dust to the epoxy mix to make the epoxy the same color as the finished wood.
 Glue the MOP in place with epoxy filling all of the route.
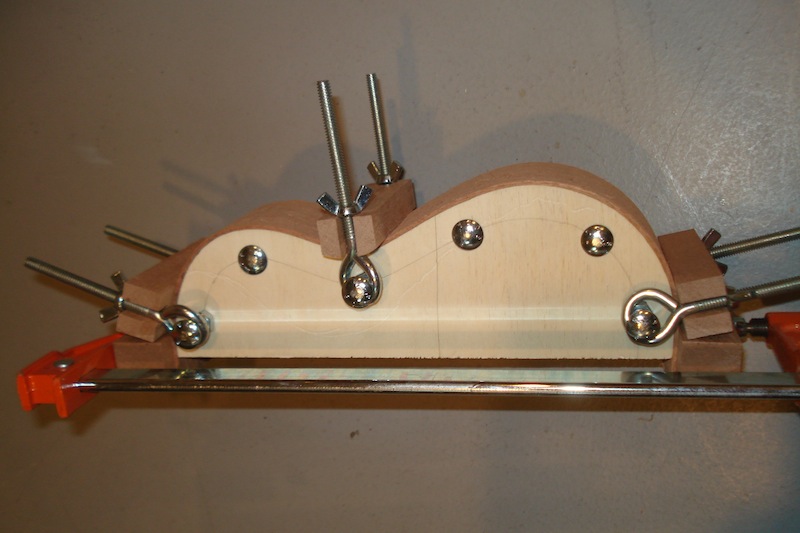
 Clamp with a caul and wax paper to seal in the goodness.  Let dry for 12 hours or so...
I left the MOP proud by a good 1/64th of an inch because there are machining marks in the face of the MOP and I am dealing with thin veneer here so I can't afford to sand through the veneer.  BTW adding saw dust to epoxy changes the epoxy's consistency (see the kayak build for more info on epoxy formulations).

Sunday, November 6, 2011

Ukulele Build Part 9

Today the sides were glued up with head and tail pieces.  Cauls were used to hold the pieces in place while the glue dried.  I also experimented with different type of linings for increasing the gluing area for the sides and top/bottom.  The kit came with thin bindings but I am used to something a little more substantial so the photo shows both type in the jig for fitting purposes.  The braces and bridge plate were glued to the tops and bottoms.  Hide glue was used for all glue joints.


Friday, November 4, 2011

Ukulele Build Part 8

The 002 uke top had its inlay placed tonight.  For this top I used two strips of black plastic binding to set off the rosette from the rest of the top.  The inlay is a combination of mother of pearl and maple.  I choose maple because I plan on using maple binding for the guitar body and these will match and tie into one another.


Thursday, November 3, 2011

Ukulele Build Part 7

The second finger board was fretted and dressed.


The first top had mother of pearl cut to fit the route in the rosette.  Plastic binding was used to finish off the remainder of the rosette.  The rosette was installed with CA glue and shellac was applied around the route to prevent the CA glue from being picked up by the grain of the top and marring the finish.


Wednesday, November 2, 2011

Ukulele Build Part 6

Tonight was fret installation night. The fret wire was cut to be a little wider than the fingerboard width.  Because the finger baord has a binding on it, the fret wire needed to be under cut on the ends to allow it to hang over the binding material.  A Stewart Mac fret nipper worked well for this and a fine file was used to clean up any remaining tang.


A fret hammer was used to seat the wire and a fret leveler was used to make the fret edges even with the binding as well as create the 30 degree beveled profile on the edge.  A fine file was used to dress the fret edges and the fret crowns will be leveled on the uke since there might be changes to the flatness of the fret board once it is mounted.


Here is a photo of one of the mother of pearl palm trees for the head stock.

Tuesday, November 1, 2011

Ukulele Build Part 5

I am in the process of making the mother of pearl (MOP) palm trees for the head stock.  The MOP was glued to a thin piece of basswood with white elmer's glue.  This adds strength to the MOP and the elmers will release later with water.

This is my set up for cutting the pearl.  The forked piece of cherry acts as the cutting support and the saw has a "medium" pearl saw blade in it (in the top photo the blade and pearl are held off to the side to show the fork).  Many jigs for cutting pearl have a blower to keep the pearl clean from dust but I use a vacuum instead to spare my lungs from inhaling the fine silicon dust that sawing pearl generates (like talcum powder).


Here is the bending jig with cauls to hold the mahogany in place while it dries.  The mahogany was soaked for an hour or so and then heated in an oven to 250 F with water soaked towels around it and aluminum foil around the towels.  This softened up the wood enough to make it easily conform to the jig.  You can also bend the wood without heating it but there is less chance of getting a crack if the wood is further softened by heating.


Next, 1000 W halogen lamps were used to dry and set the wood in the desired shape. When released from the jig, the side had just a little spring back to it but it will easily be able to fit into the building jig for the glue up.  The jig is exactly the size of the uke with the thickness of the side pieces in place.  I trimmed the side pieces while they were on the jig so they are flush with the jig and parallel to the center line.