Friday, April 27, 2012

Archtop Guitar Build - Side Bending and F-Hole Binding

I thought that bending the sides would be fairly straight forward because I've bent a number of different types of woods in the past but I was wrong.  The sides for this guitar are flamed maple and fortunately they were oversized in width so I had some long lengths of scrap to practice with.  I soaked the wood for a half hour and found that it wanted to delaminate on the flamed areas when bent without back support on my home-made bending iron.  I also found that the heat gun did not have enough power to heat the pipe enough for the sides.  It worked great on small stuff but the larger sides sucked the heat out of the system so I got a side bender from Stew Mac.

The Stew Mac site also said that highly figured woods are difficult to bend because they want to crack on the flames, just what my practice pieces did.  They suggested lightly wetting the wood with a brush and using more heat and less water to make the bend.  I was paranoid enough to try this and it worked for the sharp bends of the cutaway but it took forever to get done.  I really babied the wood, used a backing piece of thin metal as a support and what usually would take me 15 minutes took well over an hour.  For the side with just the recurves I went back to my usual 30 minute water soak and the process took about 15 minutes to get done.  The gentle curves didn't scare me like the cutaway did and I might have gotten away with it but I didn't want to chance it.   The sides were clamped in the mold and "cooked" with my halogen spots just like the uke sides detailed in a previous build on this blog.


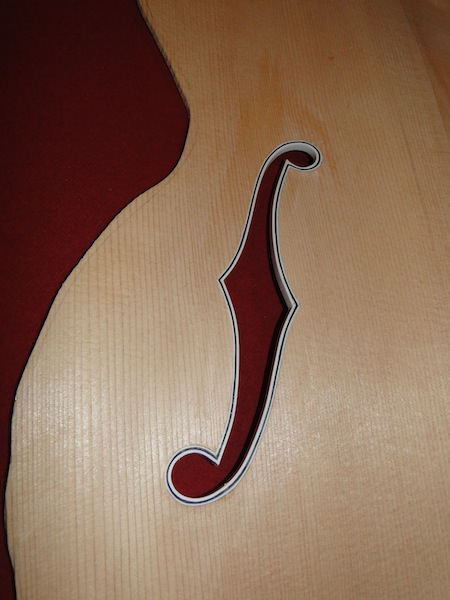
The "f-holes" were lined with plastic bindings.. These will help support the fragile scallops, cover the end grain and add beauty to the finished guitar.  I used two layers of .020 white and black binding covered by a .040 white on the inside.  Each layer is made up of four pieces.  I started with the pieces that go around the round holes.  The round profile was pre-bent using a dowel so that there were no kinks in the binding.   I used thick CA glue for the piece that butts up to the wood and thin CA for the other layers.  The thick CA doesn't get sucked up into the end grain of the wood and the thin CA is really easy to work with for plastic-plastic joints.  I used butt joints rather than the 45 degree miters described in the book.  I have found from other plastic binding projects that is is very difficult to spot the butt joints on the finished project.  One other point is that the edges of the "f-holes" lie at different elevations on the front plate.  Because the edges of the "f-hole" are parallel to the guitar sides,you need fairly thick binding material to be sure to have enough depth to cover the entire hole profile.  In my case 1/4 inch width binding material did the trick.  Because I am cautious, I did the binding prior to setting the final thickness of the top plate.  This way if something happened during binding the "f-holes" I could compensate by taking material off of either the top or bottom of the plate.


Sunday, April 22, 2012

Archtop Guitar Build - Top Plate and F Holes

I thought long and hard about the "F-holes".  The key points to my thinking are to keep the edges perfectly parallel to the sides and make sure the holes are perfectly round.  From previous experience, I know that your eyes can pick up small imperfections and round holes are prime causes of imperfections.  My options were to cut them by hand or spend time building a jig to cut them by router.  I chose the hand route since it seemed a little quicker since I am making only one guitar.

The book calls for cutting the "f-holes" into the finished carved top plate but once you carve the top plate, you've removed the flat bottom of the plate.   That flat bottom could act as a support during the cutting of the "f-holes" (rather than a narrow perimeter) and also help in layout.  I started by measuring where the centers of the round portions of the "f-holes" were located and I marked them on the flat back of the top plate.  This was much easier than trying to find them on a curved surface.  I then drilled small pilot holes from back to front on these marks using the carving jig as a support.  These pilot holes were used as references for scribing the shape of the "f-hole" onto the top side of the plate.  Next, the appropriate sized forestner bits were used to drill the perfectly round and perpendicular holes (I used a small backing plate to prevent tear-out on the back side).  This is what the plate looked like at this time.

 A scroll saw was used to cut the reminder of the "f-holes" out.
 The plate was now carved just like the back plate, once again the stained area was a test of liquid dye.
 Here it is about half way through.
 I then made a small wooded "L" that I used for sanding up the edges of the "f-holes".  The "L" was used to keep the sand paper perfectly perpendicular to the bottom of the carving jig.   This worked really well to clean up the saw marks, make the curves flow well and keep the side edges of the "f-holes" parallel to the sides.  This is what the plate looked like at this stage.


Friday, April 20, 2012

Archtop Guitar Build - Carving the Inside of the Plates


When I read the Benedetto book a decade ago the one thing that struck me as really cool was using a drill press to drill index holes to insure a uniform thickness on a curved plate.  I finally got the chance to try this out by carving the inside profile of the back plate.  I started with the back plate because if I screw up while trying this for the first time, I'd rather not have the flaw in the top sound plate.

I made a stand off for the drill press table that bolts to the table and has a 1/4 inch dowel that sits directly under the 1/4 inch drill bit.  The plate is held parallel to the table and the thickness of the back is a uniform 3/16 inch as measured perpendicular to the drill press table.  I chose a drill bit that matched the diameter of the dowel to make sure the bit's tip cut to the exact depth at the bearing point of the dowel.  As I figure it, a larger bit runs the risk of making a cut that is too deep because the profile of the plate might drop off at a pitch that is greater than the pitch of the drill bit's cutting edge.  This would make the hole too deep at the perimeter and make the plate too thin at this point.  I spent around 45 minutes peppering the inside of the plate with depth holes.  I set the distance between the top of the dowel pin and the tip of the bit at a little over 3/16 inch since it is much easier to remove wood than it is to add wood.  This is what the plate looked like at this stage.  The amber color in the middle was a test of dyes for finishing.  I figured since the wood was going to be removed, this was the best chance to play around with dyes on the actual plate to see how the grain behaves.


 I then mounted the plate in the carving jig and used a 3/4 inch chisel and mallet to remove most of the excess material.  I wondered if I should have titled this post "How to turn expensive quartersawn flamed maple into saw dust and wood chips."  One nice aspect about using a drill bit is that the profile of the point works as a really good indicator of how much material remains to be removed.  You start out with a hole that then turns into an inverted cone and the diameter of the cone continues to decrease until you are left with a tiny dot just prior to reaching the final thickness.  I used my home-made plane and it did the job it was intended for but the hand chisel worked better for me because it is much more aggressive for hogging out wood.  I then switched to random orbital sander with 60 grit paper to get to the final depth.  Here is half of the job done and the other half most of the way to completion.  On the unfinished side you can see what I mean about the dimple diameter decreasing to a dot.
 Here is the completed plate. 
Earlier, I had built a depth gauge for measuring plate thickness.  The three markings are for 1/4, 3/16 and 1/8 inches.  I chose to use brass rod for the trigger rather than the bar stock described in the book.  This gave me the option of rotating the trigger should I need more clearance for the plate near it's edge.  The D string is run around a fixed brass rod bearing point, threaded through a hole in the trigger rod and then seized to the rod with thread.  I placed a self adhesive address label on to brass shim stock for the depth gauge.  A steel wire is used for the depth indicator and I built a corresponding pyramid shaped opposing stop.  When you use the gauge, be sure to use only enough pressure to touch the surfaces of the wood.  The trigger mechanism has enough power that if you horse on it, you can cause the long unsupported upper wooden pieces to want to come together and give an inaccurately shallow reading.
One problem that I noted as I drilled the first hole is that the end grain of the dowel was harder than the top of the plate and the plate top had little shallow dimples in it that corresponded to each hole drilled on the other side.  This struck me as funny because it looked a lot like my first metal working project.  I was about 9 years old when my dad set me down at the bench with a 1/16 inch thick copper plate and a ball peen hammer and showed me how to hammer out a bowl.   It is a good thing that I set the depth at a hair over 3/16 inch because when I sanded the top of the plate to remove these dimples, I ended up at 3/16 inch.  My previous attendance at the "school of hard knocks" paid off...


Tuesday, April 10, 2012

Archtop Guitar Build - Smoothing the Plates

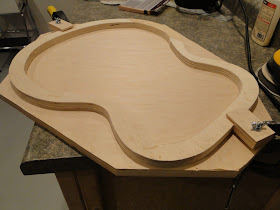
A carving jig was built to hold both plates while the surfaces are smoothed.  It doesn't have the cut away because it has to be able to hold the plates with either outside or inside profile showing.

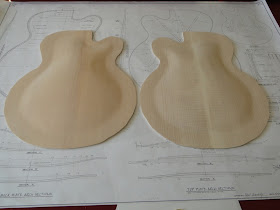
I started with the maple back plate because if was going to mess up it was going to be on the back plate. I used 60 grit paper in a random orbit sander to connect the bases of each layer so that a smooth and fair profile was achieved.  The lower most layer (1/4 inch thick) was left untouched because this level has a rebate carved in it once the body is assembled. This rebate will decrease the thickness to 1/8 inch in an area just inside of the linings and will make the top more resonant.  Here is a photo of the rough finished back next to the unfinished top.
And here are a couple of more photos with a side light to show the profile carved into the back plate.

Here is the front plate, now also finished.
 I also built a bending station for the sides.  The maple test strip bent well with this set up and I now have a heat gun for a plexiglass bending project.

Archtop Guitar Build - Carving the Plates (making the plateaus)

The Safe-T Planer that was described in the last post was used in conjunction with the templates from an earlier post to make the initial carving of the top and back plates.  The plates were cut to within 3/16ths of an inch from their final profile.  I left the extra material because the sides have not yet been bent and I don't want to risk having the top and back plates end up being too small to covert the sides.  These can easily be trimmed up later.  The plates were also slightly over sized thickness wise because I wanted to be sure that during the glue up, I didn't end up with a plate that was too thin to have the final profile cut into it.

The templates were used to mark the locations of each of the "topo lines" for the top and back plates.  I started from the highest point and removed all of the material until everything ended up 1/8 inch low to the top plateau.  I continued using the Safe-T Planer until all of the profiles had been cut.  Because the plates were slightly over thick I then made sure that the lowest level was exactly at 1/4 inch and trimmed each successive level to 1/8 inch above the one below it so that the final profiles were exactly what they needed to be.  It took about 3-4 hours to do this and here is the end result, maple to the left and spruce to the right.


Next I will build a carving jig to hold the plates while I connect the perimeters of the levels to make a smooth arch.

Sunday, April 8, 2012

Archtop Guitar Build - Safe-T Planer

(Cue up the retro 80's new-wave Men Without Hats song)
S-A-F-E-T-Y Safe-T planer...

The Safe-T planer is a tool that looks anything but what it's name proclaims, "Safe."  Imagine three razor sharp blades rotating in a drill press at 3100 RPM with no safety guards between your fingers and the blades and I think you can see what I mean.  The photos in the instruction manual show men with shop aprons and pipes in their mouths using the tool to make picture frames.  This harkens back to a time when Popular Mechanics predicted that we would all be flying cars to work by the late 1980's.  There is no way that a tool like this would ever make it past the lawyers in this day and age, yet many guitar makers swear by the tool while others claim that they own one and would never dream of using it.  How dangerous is this tool?

The Safe-T planer was manufactured by Wagner and features three cutting blades that are housed in an aluminum disk with a steel spindle.  The blades must be aligned with index marks scribed in the bottom of the disk and are held in place by three screws that are accessed from the top.  The tool comes in two varieties, one for a drill press and the other for a radial arm saw so be careful to get the correct one for your workshop.  There is an abrasive disk included in the kit that mounts on a spindle for sharpening the blades.  This disk has the correct radius on it's edge for regrinding the cutter heads.

I built a table extension for the drill press and sealed it with shellac.  The table was buffed to a satin finish which I think is important so that the work piece slides easily across the surface and to prevent dust and chips from accumulating under the work piece and raising it on the table. 

The table must be set absolutely flat to the disk.  A wire scribe with a 4 inch radius can be made from a coat hanger and mounted in the drill press chuck.  This can be slowly spun to check that the table is completely flat in respect to the cutter.  I saw one video on line where the person put a very small shim under the table on the feed side so that the cutters only cut on the leading edge.  He claimed that this eliminated burning and seems like a good idea if you don't mind having light scallops cut into the surface.  The important concept that I am getting at is this.  If you look at a rotating disk on edge, it has an infinate radius (ie is flat) and if you rotate the disk 90 degrees it has a radius equal to whatever radius the disk has.  If however you rotate the disk at an angle between 0 and 90 you will cut an elispe with either a very large radius (at shallow angles) or one approaching the radius of the disk as you near 90 degrees.  The tool manual describes using the tool to cut scalloped edges for raised door panels and picture frames by running the tool at some angle to the work piece.  This is a very useful aspect to this tool and one that I plan on taking advantage of in the future...

The tool seemed to be very sharp right out of the box and cut though maple with great ease.  It throws small chips at a prodidgous rate so a very powerful vac system with a large feed would be needed to keep up with the tool.  Surprisingly, the tool does not want to hog or pull the piece if it is fed against the rotation of the planer.  It operates quietly and smoothly and at no time during the hours that I used it did I ever feel unsafe. 

The most dangerous tool is a dull one so I removed the cutters and lightly sharpened them using the abrasive disk.  I used a drill press vise with a "C-clamp" mounted to prevent the cutter from rotating (as described on the Stewart Mac web site).  After a fine wire was formed at the cutter's edge, I stopped and removed this burr with my finger nail.  After remounting the cutters, I was amazed at the improvement in performance.  It cut well to begin with but was even better with the oxidized edge of the cutter head removed.

During the two to three hours that I took to cut the top and back plates, I sharpened the cutters twice.  The second time I held the cutters by hand to sharpen them (like the manual shows) and I have to say this is the way I will do this in the future.  There is a lot of fiddling around to get the table height set just right with the vise/c-clamp set up that is avoided by doing this by hand.  You remove such a small amount of cutter head that it literally takes seconds to make the regrind.

My final assessment is that this is a very useful, versitile and safe tool to use provided you know what you are doing and keep the tool sharp.  The most dangerous time when using a tool is when you get overly comfortable with it and start taking short cuts and pushing the limits with the tool.  As long as you keep this in mind and give it the respect it deserves I don't think it will give you any problems.

Friday, April 6, 2012

Archtop Guitar Build - Millwork, Jigs and Tools

The wood for the archtop arrived from Bow River Woods in British Columbia.  This is their 1A quality wood set and the top is quartersawn, book matched, Sitka Spruce with an average of 17 lines/inch over the entire 9 3/4 inch width.  The back, sides, neck are maple with a small amount of fiddle-back to it.  The fingerboard and bridge are ebony and have good uniform color to them.  Overall I am pleased with the quality of this beginner grade wood set and the price was the best I had found.  The package weighed over 30 pounds so the shipping was slightly over $50.  The wood was left for a week to acclimate to the temperature and humidity of the shop.  The one piece neck is the huge quartersawn board on the left in this photo.

This is the used Wagner Safe-T planer that I bought from e-bay.  I had to clean up some surface oxidation but the cutters are sharp and cut true.  This will come in handy later on when it is time to carve the top and back.
The top and back were trued up, thickness planed and joined with hide glue.  Particular attention was paid to the butt joints so that the joint showed no gap on back lighting when the pieces were stacked on edge with no weight applied to close the joint.  Benedetto says this is important to prevent seperation later in the life of the guitar.
 A body mold was made from plywood.
Based upon a design by Bob Gaffney, small hand plane from Home Depot had an auxillary base of ebony epoxied to it and had gentle curves cut into it in both the transverse and longitudinal axis.  These curves are tighter than the inside profile of the top and back.  The blade was ground to match the transverse curve and honed to a fine edge.  This will be used to carve the insides of the top and back.
 This is the fingerboard after truing one surface on the jointer planer and then thickness sanding the other using an auxillary fence on my spindle sander.  I've used this set up for years and it does a really great job.  When I hit 1/4 inch I stopped and if you look closely you can see rough saw marks that remain on the left side of the board.  Since there will be a 12" radius to be cut into this surface and the board is a little long and wide of final shape, I will leave this and deal with it later rather than compromise the overall thickness of the fingerboard

Cuckoo Clock Repair

After about 19 years of running like a top, our cuckoo clock decided to give up the ghost.  It no longer seemed to have the power required to trip the hour mechanism for running the cuckoo, dancers and gong.  I disassembled the clock (which is no small undertaking) and used acetone to clean the outer surfaces of all of the gears that were metal (sadly many are plastic).  My brother did this for his cuckoo years ago and restored it to working condition.  Unfortunately this did not fix our clock so I called around and it seems that cuckoos last about 20 years and then need so much work that by the time you add up the repair costs, you are most of the way to a new clock.  Many repair men will no longer fix them because they are so time consuming to work on.  I did get one repair man to tell me that if I wanted to I could try oiling the clock.  I had heard that there were different weight specialty oils used for the various parts of the clock so I did not try this when I had it apart the first time.  I asked him what kind of oil to use and he said to use one that had no petroleum or cleaners in it (like 3-in-one) and said that he uses mobile 1 symthetic 0 weight oil.

This is the inside of the clock with the music mechanism and drive gears removed.


I looked around the hardware store and came across a non petroleum oil used for turbines that was as thin as water in the bottle.  I then disassembled the clock once again and lightly oiled all of the bearing surfaces of the various mechanisms.  I built a test bed to support the clock so that I could have it perfectly square, have the weights hang and still be able to get to the inside for adjustments.  It now has the power to run all of the many trips and other mechanisms to make it sound the hour.  The test bed really helped because there are many small adjustments that need to be set so that all of the various drives run smoothly that it is critical to be able to access the insides while the clock is running.

She is now back up on the wall and running again, just like new.

Monday, April 2, 2012

Archtop Guitar Build - Lofting the Top and Back

Most of us start out building wooden projects that are made up of pieces of wood that are joined to one another at right angles and end up square and box-like.  The top and the back of the archtop present a special challenge because they are anything but flat and two dimentional.  The problem is how can a draftsman convey the shape to the builder?  Here is where we can take a page from the naval draftsmen to solve this problem.  Ships and boats are rarely square and box-like so naval draftsmen came up with a standard way of drawing up plans so the dockyard can build the vessel the way the designer envisioned it.  The drafts look like this.

The three views are called (top to bottom) Body Plan (aka Hull Sections), Sheer Plan (side view) and Waterline Plan.  The draftsmen for the Benedetto plans included some Body Plan views and one mid-line Sheer Plan view but no Waterline views.  These are the ones that we really need so that we can know what the contour of the top and bottom should be!  Leaving these out is a major flaw in these plans.

There is a way that we can make our own waterline views of the guitar and "loft" the plans for ourselves as a naval architect would do.  Start by choosing a standard increment and draw a series of parallel lines starting at the base line and working your way up to the top of each Body Plan drawing.  Next look for where the upper surface of the plan just crosses the scribed lines and draw a line at right angles from the baseline to this point.  Next measure the distance from the center-line to this point and make a table of these values.  In my case I chose 1/8 inch as the increment and made the measurements to the closest 1/16th inch.  It should look something like this.

 
Now take an appropriately sized sheet of heavy card stock and trace the outline of the top onto it (in my case I used my body mold so that it is exactly what the shape of my guitar will be since the mold may vary slightly from the plans).  Draw a center line as well as the index lines A-E from the plans.  Now measure out from the center line and make small tics on the lines A-E from the table of measurements that you made previously.  You can also take measurements from the center-line profiles (drawn to the left of the top and back plate drawings) but on my plans, only the top piece profile was accurately drawn (the back piece profile marks did not line up in such a way to make fair lines as described below).

Now you have to use your creative eye and connect the dots in such a way that the line lay "fair" to you.  What does this mean?  Take a look at the ship plans above and notice that all of the lines make sweeping gentle curves with no sharp angles.  This is know as "fairing" the lines and we need to do this for the guitar top and bottom.  Take a look in the book and see the drawing showing all of the drill holes in the top that are used as depth gauges.  This can help guide you in the areas like near the cut-away where there are not many reference points.

A few additional observances.
-In theory, the top and bottom would be symmetrical if there were no cutaway.  This means that below the waist of the guitar, the measurements left and right of the center line should be the same for each 1/8th inch, if they are not then check and see why.  In some areas where the curve is fairly flat over a long area it is easy to not choose the right index spot.  Look at the photo above and see the first marks in the lowermost drawing.  The first measurements are different by 1/4 inch because of the flatness of the curve, step back and see which one looks better to you and use that measurement for both sides since this should be symmetrical.
-Make sure that the highest point on the top sits in front of where the bridge will be.  As I mentioned in the first post, I am sure you don't want the bridge teetering on the apex of the arch.
-Pencil in the lines using a light touch and a sketching motion.  Don't be afraid to step back and let your mind say to you,"this doesn't look right."  Reassess and in the areas below the waist, make tracings of the side you like best and transfer it to the other side.
-I used cardboard that had 1/2 inch squares on it like graft paper.  This makes it a lot easier to transfer measurements from one side of the center line to the other.
-This process is very different from standard woodworking where you hold a square up the the piece and it either is or isn't square.  This is more "artsy" and requires a feel to it.  Make sure the "right" and "left" sides of your brain are both happy with the lines.

Once you feel happy with the lines, darken them in with pen, label the sections (top 1-6, back 1-7) and cut them out with an x-acto knife.  The end result will look like this.
 Make sure that the cutout in the top is oriented correctly so that you don't end up making a left handed guitar if you originally planned on making it right handed.  You could use heavier material than card stock if you like but it will require sawing which I feel would be harder to do than simple cutting on the lines with a knife.


Sunday, April 1, 2012

Archtop Guitar Build - Opening thoughts...

I am tooling up to build an archtop guitar based upon the design from Bob Benedetto's book "Making an Archtop Guitar."  I first read this book many years ago and was struck by several of the cool ways that he goes about solving the many interesting problems presented during the building process.  Over the years I've often thought about the drawing in the book that shows how to use a drill press to make a series of holes at different depths in the top surface of the guitar top plate and then using these holes as indexes to guide the contour of the carving process for the top.  This is just one of the many interesting ideas presented by the book.  I recently worked on an archtop (see the Harmony post on this blog) and this is what got me re-started thinking about building an archtop.

It is telling that the last chapter is about marketing and I must say that Benedetto is unashamed about marketing.  The only color photos in the book are a gallery of shots of photos of his guitars and many pages are devoted to showing the "who's who" of people who own and play his guitar.  Be warned, you cannot make a guitar using just the book, you also have to buy the set of plans for the guitar since there is no full sized body template and there are no directions for exactly what contour the top should be carved to.  Oh, there are a set of templates but none are on cardinal locations for the top or even show a uniform baseline to work off of.  They are essentially useless.  Did I mention Bob is a good marketer?  Oh by the way he describes tapping the top and body at various stages of the build but how do you explain what to listen for in a book?  Did I mention that there is a video series also for sale?  I don't know what is on those DVD's since the library doesn't carry them and I don't want to pay the $130+ to find out...  Don't get me wrong, the book is great and the plans are worth the price but don't think you can get by with just the book.

There are subtle differences between the book and the plans, and I am going to stick with the plans in the case of any variation.  One of the tools used in construction of the guitar is called a "Safe-T Planer."  I'll post a photo once mine arrives but they are no longer in production so you will have to look to the secondary market for them.  They are currently between $130 and $220+ on E-Bay and they originally listed for around $50 so there must be quite a few people building archtops looking for them.  They look anything but "safe" but from those that I've talked to who have used them, they work really well so we will see...

There are three key goals to building a guitar: good looks, good sound and playability.  Of these three, the first is the easiest to achieve and the least useful if you plan on using the guitar for anything other than ornamentation.  Good sound is going to be a matter of building a bunch of guitars and learning what works and doesn't work.  Since I don't plan on becoming a full time archtop builder, I'm going to have to rely on Benedetto when he says that if you follow the plate guides "even a first time builder can make a surprisingly good sounding guitar."  Lastly playability is something that I can do something about.  A guitar can be thought of as a series of strings suspended between the nut and saddle.  Everything else (neck, body, bridge, fingerboard, frets, headstock...) is aimed at making these strings sit low enough to the fingerboard/frets to make for easy playing yet not so low that they buzz on the frets.  This is what makes a guitar easy to play and feel good to the player.  With that in mind, lets look at the archtop guitar as a whole.

First off, the archtop is an acoustic guitar that has a resonating chamber to amplify the sound.  We know that arches are stronger than flat surfaces so it would seem logical that an arched top should be stronger than a flat top.  What is really surprising is just how thick an archtop is!  A standard flat top acoustic will have a fairly thin top (well less than 1/8) that is reinforced with braces on the rear.  An archtop has just two braces that run in an "X" or "parallel" to each other but the archtop can be up to 1/4 inch thick!  This is massive for an acoustic guitar top.  How is this thing ever going to vibrate enough to make any sound, especially higher pitched sounds?  A thin 1/8" thick rebate is carved around the perimeter of the top to free the center section of the top so that it can move sort of like a drum head that is suspended by it's perimeter.  Very clever. 

It is also very important to keep the geometry of the final guitar in mind while working on the various stages of the build.  For example if you look really closely at the plans for guitar and make a contour map of the top, you will see that the highest point of the top arch sits just in front of the bridge position.  This is absolutely critical and if you mess up on this, I bet you will ruin the guitar because the bridge must sit on the upslope of the arch and cannot teeter totter on the crest.  If you messed up on this in the carving process (one of the first things you do) you will be in for a very rude surprise when you try to set up the guitar at the end of the build.  Trying to fix this at the end will change the arch and body/neck geometry and might not be possible fix.

Most guitars have the neck coming straight out from the body with little or no set back angle to it.  The large hump of an arch that we just talked about requires the neck to have a fairly substantial 4 1/2 degree set back because the bridge sits so high relative to the neck/body joint.  Again, everything depends upon that nut/saddle string relationship and this is a part of that equation.  Once again, because of that arch, the neck extension must be carved to clear the arch and the finger board must sit fairly high to reach the strings  You need to understand every process described in the book before you begin because if you don't, you might easily make a mistake early on (like the crest of the top described above) and not be able to fix it later.

I plan on using this guitar to play out with so I will put a pick up on it.  Benedetto's pick up mounts under the pickguard and the wires to the end jack run through the "f" hole.  His pickup is really spendy so I will try winding my own and encase it in a wooden mount just like his.  I also plan on standing up with the guitar and I don't like strap buttons mounted in the heel of the neck so I will have to add a reinforcing block on the inside upper bout to accept the strap button.  Since there is no access to the inside of the body (because of the small f holes) I'll have to do this before gluing the top and backs on.

I hope there is nothing else I'm missing here.  All in all this is a really cool project and should be quite a challenge!