
Sunday, October 30, 2011
Ukulele Build Part 4
Plastic bindings were added to the sides of the finger boards. Each fingerboard needed to be reduced in width to allow the plastic bindings to fit the neck width. I tired tight bond as a glue but this didn't work well so I switched to thin CA glue and this worked very well. The plastic was pre-bent to fit the profiles of the fingerboard edge and the CA bonded instantly and firmly. Scrapers and sandpaper were used to make the binding flush with the fingerboard profile.
Thursday, October 27, 2011
Ukulele Build Part 3
Here is the ebony fingerboard with mother of pearl inlays. The fret slots were cut with a .020 slitting blade in my Byrnes table saw so everything is good, square and true. I used a dremel with the Stewart Mac base to make the inlay recesses (please see the inlay post on this blog for more details). I also used a down cutting bit to level the MOP to the fingerboard after the epoxy dried. This saved a lot of hand finishing and time plus it protected the finger board from sandpaper dings in the leveling process. The other photo is of the head and tail blocks for the body.


Monday, October 24, 2011
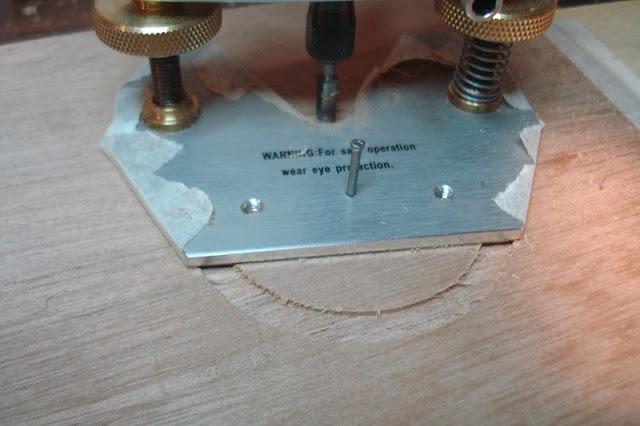
Ukulele Build Part 2
This build might move along a little slower than most others because this one is going up live as the build goes on as opposed to most of the others which are retrospective. Tonight the sound hole and route for the rosette were cut. A Stewart Mac router base was used along with a 1/4 inch cutter to make the rosette route. A hole was drilled through the router base and the router and bit were nailed through the uke front with the nail forming a pivot for the router assembly. The same was done to cut out the sound hole. Masking tape was used to cover the router base to protect the top from any scratches. Both routes were perfectly round.


Sunday, October 23, 2011
Ukulele Build Part 1
I'm in the process of building a pair of Soprano Ukuleles, one from a kit that I bought from Stewart Mac and the other from scratch based upon the kit. Last year for my birthday, my youngest got me a mahogany board so decided that I should turn it into a uke. Here are photos of the milled materials for the sides, fingerboard, top and back and necks before and after shaping and laminating the face of the headstock.


Wednesday, October 5, 2011
How to make rope
This is a machine that can be used to make rope for models and a larger version can be used to make full scale rope. It is called a "rope walk" and works on the principle that if you take three strands and wind them up individually in one direction, they will then release their tension by winding around each other in the opposite direction and the two forces will cancel each other out and the result is stable rope. This is what the machine that I use looks like. Turning the crank on the machine on the left causes all three strands to be spun at the same time.


Subscribe to:
Comments (Atom)