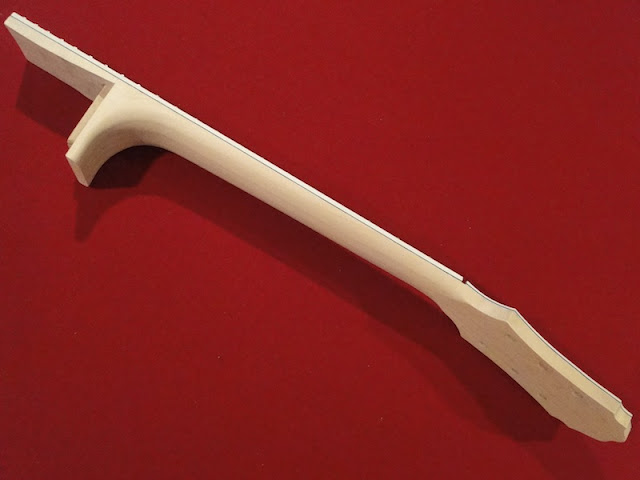
Shaping the neck looks intimidating but it really isn't (overall, this is the fourth neck I've shaped). Every make of guitar has a little different feel to it's neck. Some are wider or narrower, some have a round profile while others are more oval or even "V" shaped. One of the beauties of building your own guitar is that you can make the neck just the way you like it. My favorite neck as far a feel is concerned is my Laravee acoustic so that is the neck that I copied. Cut the profile to match and rough in the shape. I used a spindle sander but you could use a spokeshave, plane, belt sander or whatever you have handy. Be careful not to overdo the rough shaping since it is a lot easier to remove wood than it is to add it. I find that a pattern guide is handy to get the shape to match exactly. I used a random orbit sander for the fine tuning the shape. How the neck feels in your hands is the final quality assurance step.

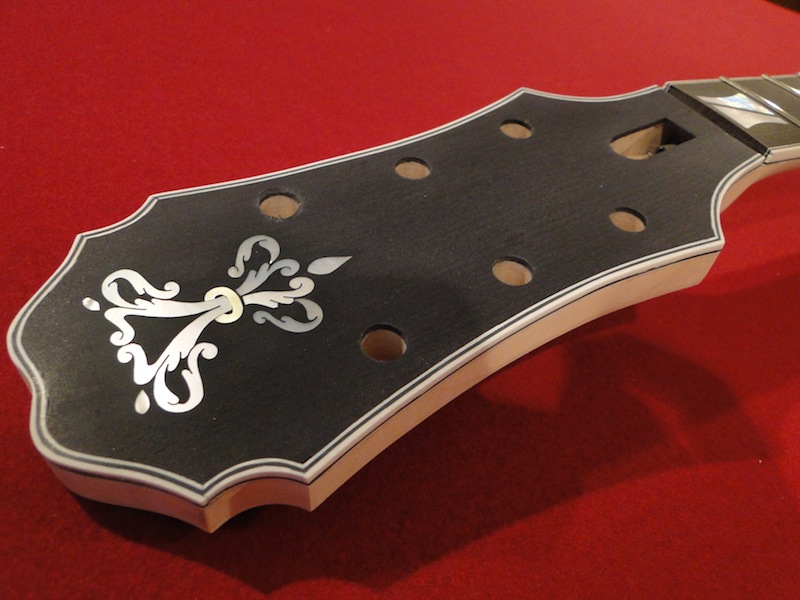
I then routed the channel for the headstock binding and installed the plastic bindings. I usually install each layer of binding individually and build up the layers one by one. The advantage of this is that you can use butt joints instead of cutting miters. This time I tried laminating the thin .020 black and white together to make the installation easier but the miters were a bear and ended up making the process take a lot longer than if I had done it the way I always do. I used butt joints on the outermost layer of .040 while with .020 black and white on the bottom (this was a one piece build-up).
The headstock mother of pearl inlay was laid out and cut. The detail of the inlay required having the black epoxy seep through to fill the fine cuts in the design. I routed this a little later at night than I usually like to work (because bad things happen when you are overly tired) and I was a little sloppy in some of my cuts but the black epoxy covers over a multitude of minor errors. The piece was loaded with epoxy and a level was used to insure the headstock was flat because the thin epoxy will self level, even through cracks only a few thousandths of an inch wide.
Here is the end result of the headstock inlay and binding process.

One other thing that I should point out is that I changed the geometry of the nut slot from what the plans call for. Benedetto likes to run this fingerboard and headstock binding as one continuous line. I think this looks great but the way he does it is by having the bottom of the nut slot run at an angle that matches the headstock angle. This means that the bottom of the nut has to be cut at an angle to match the headstock angle. I would really rather have my nut sit in a perfectly flat and square slot. This will make fitting easier and could improve the guitar's tone because the nut/neck interface is an important part of transfer of string vibrations to the guitar itself. I made my flat of the neck (for the fingerboard) a little longer and used four layers of black veneer to make the top of the headstock hit the nut in such a way that the binding material for the headstock can be wide enough to visually match the fingerboard binding. You can sort of see that in this photo of the finished neck.

It is now time for the final fitting of the neck to the body. A piece of carbon paper with a strip of blue masking tape on the back for reinforcement was used to mark the high spots on the back of the neck extension. These high spots were removed with a scraper and the process was repeated about twenty times until a uniform dusting of black was seen across the joint.
This is one point that I'd like to make for anyone building an archtop. The landing area for the neck extension is something that you need to think about early in your build. When you make your templates for the top plate, make sure that you leave a perfectly flat landing area for the headstock extension. This will make the fitting of the extension much easier when the time comes. I sure wish I had done that...


Looks great - nice job with the headstock binding and inlay, especially. I think your change on the nut/neck profile makes sense. I as tempted to do hat you did, but a little timid to change the plans here.
ReplyDeleteThanks Bob for the kind comments. The back of the Benedetto book has a quote from Les Paul stating that "Bob makes guitars the right way." It is pretty hard to argue with with a guitar building legend like Les Paul but I figured I'm building this for myself and not a client so I can take some chances and see if they work. Time will tell...
ReplyDelete