
Showing posts with label Archtop Guitar. Show all posts
Showing posts with label Archtop Guitar. Show all posts
Friday, October 5, 2012
Archtop #2 looking rather blonde
Here is the guitar hanging next to the already completed archtop. Quite a difference in tone between unfinished and finished colors.


Sunday, September 23, 2012
Archtop #2 well on the way...
Here are some update photos of the second archtop guitar build. It's nice to get some mileage out of all of the specialized jigs needed to build these.


Sunday, September 9, 2012
Archtop #2 Started
I just started up archtop number 2. Here are a few photos of the first few days work. Since I am pretty much doing it the same way as the last one I'll only post photo updates.


Tuesday, August 14, 2012
Archtop Guitar Build - Finished!!!
It has taken a while but I have now turned this...
 into this...
 I'm very pleased with how it turned out in terms of tone, ease of play and looks. I also took it in to get a professional opinion and our local luthier (Bill Hatfield) really liked it after he put it through the paces both acoustically and electrically. This past weekend I played it in church for the first time and it got good reviews so now to build another one.
Here are some close-ups of a few of the details of the guitar. First off is the finger rest and it's mounting block. If you look closely you can see that I've cut a bevel into the side facing the strings. This is because the neck sits low to the body (explained in an earlier post) and I needed a little more clearance between the high E string and the finger rest when finger picking. The pickup is a Kent Armstrong sidemount slimline humbucker. I really like the sound of this pickup and the shielded wiring make it very quiet. The single pot is for volume and I thought about a tone pot but there really is no room for it on the finger rest. The end jack is a Fishman stereo jack that I've wired mono with the leads going through the upper roundrel of the "f-hole."

 The tail piece mounts via a sarconi strap to the double ringed end jack. The bone insert protects the edge of the top and works well. The strings that I am currently using are nickle jazz 11's.
 I hope that you've enjoyed following along with this build and be sure to check out the other cool and eclectic collection of things that I've built that are on this blog!


Here are some close-ups of a few of the details of the guitar. First off is the finger rest and it's mounting block. If you look closely you can see that I've cut a bevel into the side facing the strings. This is because the neck sits low to the body (explained in an earlier post) and I needed a little more clearance between the high E string and the finger rest when finger picking. The pickup is a Kent Armstrong sidemount slimline humbucker. I really like the sound of this pickup and the shielded wiring make it very quiet. The single pot is for volume and I thought about a tone pot but there really is no room for it on the finger rest. The end jack is a Fishman stereo jack that I've wired mono with the leads going through the upper roundrel of the "f-hole."


Thursday, June 21, 2012
Archtop Guitar Build - Tail Piece
The more I thought about putting the final coats of finish on the guitar, the more I thought that this is a bad idea seeing that the finger rest, pickup, tail piece and bridge are not built yet. If I finished the guitar I was taking a chance that one of these pieces would have problems, not fit correctly and something would need to be done to the front plate that would require redoing the finish.
The tail piece is made from ebony and I had to wait a while to find a piece on e-bay that was big enough to make both the tail piece and finger rest. I looked around at different designs and really liked the tail piece design that McCarthy guitars uses. Instead of having the strings sit through the tail piece in slots, they run their strings through holes bored into the front end of the tail piece.
A 12 inch radius was cut into the top of the tail piece and holes were bored for the strings. Corresponding holes were bored for the ends of the strings and channels were cut into the top to allow for easier passage of the strings. I made mother of pearl inlays that match up in design and form to the fret markers. The back of the tail piece had holes bored for the tail strap and channels were routed to accept the retaining nuts for the tail strap. A channel was cut into the back and a fulcrum of ebony was installed. I also made side bevels to make the tail piece look less "bulky". I also used some color-tone black dye in water to make the ebony a uniform black. Here is the end result with a couple of scrap strings in place to aid in checking the angle for the finger rest.


The tail piece is made from ebony and I had to wait a while to find a piece on e-bay that was big enough to make both the tail piece and finger rest. I looked around at different designs and really liked the tail piece design that McCarthy guitars uses. Instead of having the strings sit through the tail piece in slots, they run their strings through holes bored into the front end of the tail piece.
A 12 inch radius was cut into the top of the tail piece and holes were bored for the strings. Corresponding holes were bored for the ends of the strings and channels were cut into the top to allow for easier passage of the strings. I made mother of pearl inlays that match up in design and form to the fret markers. The back of the tail piece had holes bored for the tail strap and channels were routed to accept the retaining nuts for the tail strap. A channel was cut into the back and a fulcrum of ebony was installed. I also made side bevels to make the tail piece look less "bulky". I also used some color-tone black dye in water to make the ebony a uniform black. Here is the end result with a couple of scrap strings in place to aid in checking the angle for the finger rest.


Saturday, May 26, 2012
Archtop Guitar Build - Fingerboard and Neck Extension
The neck for this guitar is made from a single piece of maple so there are a few aspects of this type of construction that I will take advantage of. The neck was planed square, the headstock angle was cut and a channel was made for the truss rod. I am using a Stewart Mac "Hot Rod" dual action truss rod for this guitar. I purchased a spiral cut router bit that was exactly the same size as the truss rod width so the fit would be perfect. A dovetail was cut into the end of the neck to connect it to the body.
The fingerboard extension was something that I thought about long and hard. The plans call for cutting a 5/8 inch rabbet into the end of the neck and then trimming away about half of the material to thin it out enough to allow the neck to sit low enough to allow a distance of 3/4 of an inch to be obtained if a straightedge is held over the fingerboard and extended over the body to where the bridge sits. The problem with this way of attaching the neck extension is that you remove a perfectly cut dove tail with the rabbet and then have to re-cut that dove tail into the bottom of the fingerboard extension and this entails carving into a blind corner. I thought about this and came up with this alternative. A dovetail could be cut into fingerboard extension instead and this strong joint could be used to attach the extension. This would allow you to fit the neck into the body and remove the fingerboard extension for frequent trimming of the extension to get the fit just right. This is what the neck and fingerboard extension joint looked like. The truss rod is also in place.

 The fingerboard was run though my model making table saw to cut the fret slots and the taper was also cut into the sides. Plastic binding material was run around the edges and mother of pearl inlays were prepared. I really liked the inlays shown on the plans but when I looked around, I couldn't find ones that matched them. I bought a set of generic block inlays (like on a Les Paul Custom) and cut scallops into the edges to make them "hour glass" shaped. I then cut them at a 66.6 degree angle and fitted ebony strips between the two pieces and super glued the three pieces together so I had to only make one recess for the inlay rather than two. These were glued in using epoxy with a couple of drops of amber and black Stew Mac Color Tone dye added. This makes the epoxy "ebony" colored and any imperfections in the routs are magically hidden. The finger board was set in place and a couple of pieces of fine wire were drilled though two fret slots to act as indexes for the glue up. I used hide glue for this so that if I ever needed to replace the fingerboard, I could steam it off. Here is the glue up.
 The fingerboard is a uniform 1/4 inch thick so a 12 inch radius must be cut into the surface of it. I bought a 12 inch Stewart Mac radius block from Bob Gaffney (be sure to check out his very well done archtop blog) and installed two shooting boards into the sides of the neck block. This is one place where altering the neck building process from that described in the book works out well. By leaving the block intact I can easily mount it in a workmate, hold the fingerboard in its final position and also mount the shooter boards with screws so that the radius block always travels straight down the fingerboard with no deviation left or right. Here is the neck and fingerboard after 100 grit sanding to a 12 inch radius.

The fingerboard extension was something that I thought about long and hard. The plans call for cutting a 5/8 inch rabbet into the end of the neck and then trimming away about half of the material to thin it out enough to allow the neck to sit low enough to allow a distance of 3/4 of an inch to be obtained if a straightedge is held over the fingerboard and extended over the body to where the bridge sits. The problem with this way of attaching the neck extension is that you remove a perfectly cut dove tail with the rabbet and then have to re-cut that dove tail into the bottom of the fingerboard extension and this entails carving into a blind corner. I thought about this and came up with this alternative. A dovetail could be cut into fingerboard extension instead and this strong joint could be used to attach the extension. This would allow you to fit the neck into the body and remove the fingerboard extension for frequent trimming of the extension to get the fit just right. This is what the neck and fingerboard extension joint looked like. The truss rod is also in place.


Sunday, May 13, 2012
Archtop Guitar Build - Disaster Strikes
Next up was routing the channels for the bindings. I used a jig that I had built for binding the ukes and I had no problems routing the channel for the top plate. When I was working on the bottom plate channel, I noticed that the body of the guitar had a lot more resistance to pushing it forward after the bit had passed the neck block. I pulled the guitar body away and found that the spiral cutting bit had pulled itself forward in the chuck and had routed the channel about 1/8 of an inch too deep! The side of the body was veneer thin over this channel and had broken though in one area. I was sick!
When a disaster strikes, the first thing you want to do is fix it quickly but the best thing you can do is to back away and come back another day. Taking time to think through the problem helps avoid making the problem worse by trying a quick fix. There were a lot of options available. My first thought was to fill the bad route with ultra-thin model airplane plywood to stabilize the side, that's the darker brown material in this photo. I then planned on using matching maple veneer to cover the plywood core but I knew that I would never be happy with this kind of repair. It was time to gear up for major surgery.

I sawed the back plate off of the guitar and stripped out the linings for this plate. I then made new linings, installed them and leveled them out. Here is the body with new lining, placed back in the building mold just before the back plate was glued on.
 The new total depth of the body is 2 3/4 inches which is at the low end of acceptable per the Benedetto book. The only problem is that the end pin hole is now closer to the back plate than to the front but this was a small price to pay for a better repair. Here is the back plate being glued in place
 I then invested in the Stew Mack binding router set-up. It is very pricey but it works well and I knew that if it saved me from having to go through another major set-back it would be worthwhile.
 The new channels were clean and true.
 Plastic binding was installed on the problematic back plate and this is the end result.

 Here is the front plate with the bone insert for the tail piece strap.

It is nice to be back in business...
When a disaster strikes, the first thing you want to do is fix it quickly but the best thing you can do is to back away and come back another day. Taking time to think through the problem helps avoid making the problem worse by trying a quick fix. There were a lot of options available. My first thought was to fill the bad route with ultra-thin model airplane plywood to stabilize the side, that's the darker brown material in this photo. I then planned on using matching maple veneer to cover the plywood core but I knew that I would never be happy with this kind of repair. It was time to gear up for major surgery.

I sawed the back plate off of the guitar and stripped out the linings for this plate. I then made new linings, installed them and leveled them out. Here is the body with new lining, placed back in the building mold just before the back plate was glued on.



It is nice to be back in business...
Monday, May 7, 2012
Archtop Guitar Build - Body Assembly
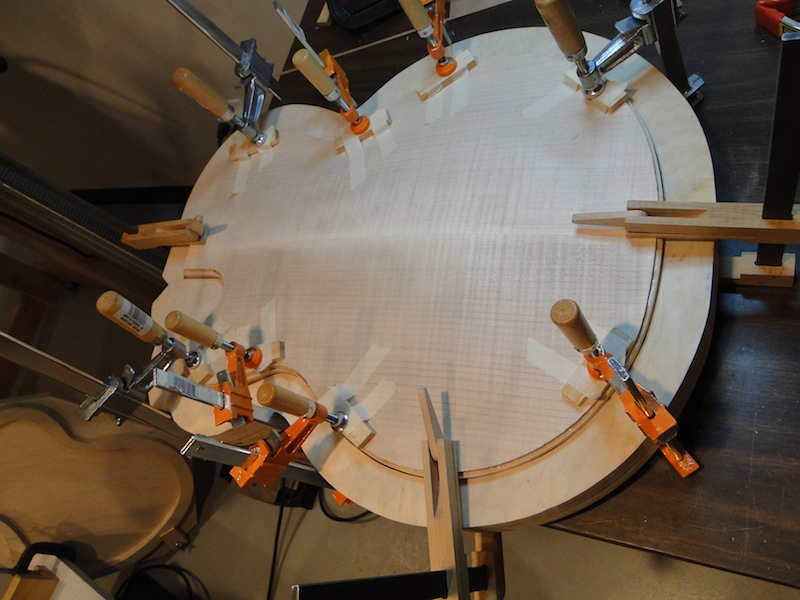
The back plate was placed under the sides and a coat of thinned shellac was applied to seal the back plate and sides. The inside of the back plate was lightly sanded and the top plate was placed into a gluing caul and glued to the sides which were held in place in the body mold. The top plate then had a coat of shellac applied and was lightly sanded.
 The top plate and sides were removed from the mold and placed back into the gluing caul and the back plate was glued in place using a second caul. Once again clamps were placed to provide even pressure around the perimeter.
 The sides and back plate were intentionally over-sized by about 3/16 inches to prevent the possibility of having them be too small for the sides (that would be really bad...).
 The plates were sized to the sides using the spindle sander with a standoff on the table to make sure that only one plate was sanded at a time. Here is the assembled body waiting for binding channels.


Wednesday, May 2, 2012
Archtop Guitar Build - Linings and Bracing
My table saw is very high precision but the blade can't be tilted so I
had to figure out a way to cut the kerfs and the incline. I squared up
quarter-sawn spruce and used this jig to make the saw kerfs every 1/4 inch on the flat stock.
The small spline is inserted into the previously made cut and indexes the cuts with good precision.


Friday, April 27, 2012
Archtop Guitar Build - Side Bending and F-Hole Binding
I thought that bending the sides would be fairly straight forward because I've bent a number of different types of woods in the past but I was wrong. The sides for this guitar are flamed maple and fortunately they were oversized in width so I had some long lengths of scrap to practice with. I soaked the wood for a half hour and found that it wanted to delaminate on the flamed areas when bent without back support on my home-made bending iron. I also found that the heat gun did not have enough power to heat the pipe enough for the sides. It worked great on small stuff but the larger sides sucked the heat out of the system so I got a side bender from Stew Mac.
The Stew Mac site also said that highly figured woods are difficult to bend because they want to crack on the flames, just what my practice pieces did. They suggested lightly wetting the wood with a brush and using more heat and less water to make the bend. I was paranoid enough to try this and it worked for the sharp bends of the cutaway but it took forever to get done. I really babied the wood, used a backing piece of thin metal as a support and what usually would take me 15 minutes took well over an hour. For the side with just the recurves I went back to my usual 30 minute water soak and the process took about 15 minutes to get done. The gentle curves didn't scare me like the cutaway did and I might have gotten away with it but I didn't want to chance it. The sides were clamped in the mold and "cooked" with my halogen spots just like the uke sides detailed in a previous build on this blog.



The Stew Mac site also said that highly figured woods are difficult to bend because they want to crack on the flames, just what my practice pieces did. They suggested lightly wetting the wood with a brush and using more heat and less water to make the bend. I was paranoid enough to try this and it worked for the sharp bends of the cutaway but it took forever to get done. I really babied the wood, used a backing piece of thin metal as a support and what usually would take me 15 minutes took well over an hour. For the side with just the recurves I went back to my usual 30 minute water soak and the process took about 15 minutes to get done. The gentle curves didn't scare me like the cutaway did and I might have gotten away with it but I didn't want to chance it. The sides were clamped in the mold and "cooked" with my halogen spots just like the uke sides detailed in a previous build on this blog.


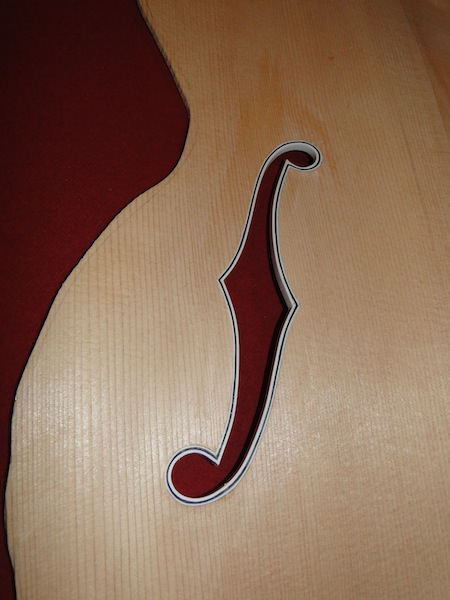
The "f-holes" were lined with plastic bindings.. These will help support the fragile scallops, cover the end grain and add beauty to the finished guitar. I used two layers of .020 white and black binding covered by a .040 white on the inside. Each layer is made up of four pieces. I started with the pieces that go around the round holes. The round profile was pre-bent using a dowel so that there were no kinks in the binding. I used thick CA glue for the piece that butts up to the wood and thin CA for the other layers. The thick CA doesn't get sucked up into the end grain of the wood and the thin CA is really easy to work with for plastic-plastic joints. I used butt joints rather than the 45 degree miters described in the book. I have found from other plastic binding projects that is is very difficult to spot the butt joints on the finished project. One other point is that the edges of the "f-holes" lie at different elevations on the front plate. Because the edges of the "f-hole" are parallel to the guitar sides,you need fairly thick binding material to be sure to have enough depth to cover the entire hole profile. In my case 1/4 inch width binding material did the trick. Because I am cautious, I did the binding prior to setting the final thickness of the top plate. This way if something happened during binding the "f-holes" I could compensate by taking material off of either the top or bottom of the plate.

Sunday, April 22, 2012
Archtop Guitar Build - Top Plate and F Holes
I thought long and hard about the "F-holes". The key points to my thinking are to keep the edges perfectly parallel to the sides and make sure the holes are perfectly round. From previous experience, I know that your eyes can pick up small imperfections and round holes are prime causes of imperfections. My options were to cut them by hand or spend time building a jig to cut them by router. I chose the hand route since it seemed a little quicker since I am making only one guitar.
The book calls for cutting the "f-holes" into the finished carved top plate but once you carve the top plate, you've removed the flat bottom of the plate. That flat bottom could act as a support during the cutting of the "f-holes" (rather than a narrow perimeter) and also help in layout. I started by measuring where the centers of the round portions of the "f-holes" were located and I marked them on the flat back of the top plate. This was much easier than trying to find them on a curved surface. I then drilled small pilot holes from back to front on these marks using the carving jig as a support. These pilot holes were used as references for scribing the shape of the "f-hole" onto the top side of the plate. Next, the appropriate sized forestner bits were used to drill the perfectly round and perpendicular holes (I used a small backing plate to prevent tear-out on the back side). This is what the plate looked like at this time.
 A scroll saw was used to cut the reminder of the "f-holes" out.
 The plate was now carved just like the back plate, once again the stained area was a test of liquid dye.
 Here it is about half way through.
 I then made a small wooded "L" that I used for sanding up the edges of the "f-holes". The "L" was used to keep the sand paper perfectly perpendicular to the bottom of the carving jig. This worked really well to clean up the saw marks, make the curves flow well and keep the side edges of the "f-holes" parallel to the sides. This is what the plate looked like at this stage.


The book calls for cutting the "f-holes" into the finished carved top plate but once you carve the top plate, you've removed the flat bottom of the plate. That flat bottom could act as a support during the cutting of the "f-holes" (rather than a narrow perimeter) and also help in layout. I started by measuring where the centers of the round portions of the "f-holes" were located and I marked them on the flat back of the top plate. This was much easier than trying to find them on a curved surface. I then drilled small pilot holes from back to front on these marks using the carving jig as a support. These pilot holes were used as references for scribing the shape of the "f-hole" onto the top side of the plate. Next, the appropriate sized forestner bits were used to drill the perfectly round and perpendicular holes (I used a small backing plate to prevent tear-out on the back side). This is what the plate looked like at this time.


Subscribe to:
Posts (Atom)