The finger rest was easy enough to make but very hard to fit to the guitar. The plans call for the guitar neck to have a set back angle and have the strings sit a predetermined height above the top plate at the position of the bridge (between the two central points of the "f-holes." I made sure of this when I made the neck but one thing that I did not take into account was the thickness of the neck where the finger rest attaches. This has to be thick enough to accept the mounting screws but also has to be high enough so that you can get a screwdriver in to seat the screws. Lastly the finger rest has to hold a pick up at just the right distance from the strings. I made a small wedge for the pickup to mount on and checked all of the distances. All of my geometry was spot on but I was a little too tight to the top plate to get a screwdriver in. This is why I took a few weeks away from the project to think this one over since no solution came to mind right away.
To further make the matter more difficult, the finger rest sits parallel to the strings but must sit low enough so that it doesn't interfere with playing, yet sit high enough so that you can use it as a "rest" for picking. Lastly the finger rest does not sit on the same plane and the strings but is canted down from the strings across the body of the guitar.
I made the finger rest out of ebony, with a mother of pearl inlay that goes well with the fret markers and tail piece inlays. I mounted a couple of tuners to the head stock and the tail piece and bridge so that I could string up low and high E strings to get the geometry for the finger rest. I then made an ebony block that would attach to the bottom of the finger rest and mount the assembly to the side of the neck. Two holes were drilled into the mounting block and corresponding holes were bored into the neck. To get around the low placement I used allen head screws. These allowed me to use a small allen head wrench that fit perfectly into the space provided and made for a very nice fit. Problem solved!
Next I did something that you are not supposed to do. I strung up the guitar with all of the strings and played it for a day. The action was surprisingly good considering I did no set up work and the guitar sounded great acoustically but I quickly found that the neck was too chunky and "square" from frets 4 to the nut. This is something that I did not appreciate when I was forming the neck but when I re-checked with a pattern guide, there was a subtle difference in neck geomertry between the Laravee neck and the archtop. They say you should not play the guitar because you will get oils into the finish that may prevent the lacquer from properly bonding but I was planning on applying more layers of shellac so I knew this would not be an issue. I am very glad I did this because I would not have been happy with the neck otherwise and I learned that for a beginner like me, there is a difference between feeling the neck without strings and playing it.
This is the finger rest. The hole is for the volume pot and the slight depression in the back is to allow the screw head clearance when inserted.
Next I cleaned the guitar and sprayed several coats of shellac, especially on the neck because it had need sanded bare in the areas that were re-worked. Any small imperfections were repaired and 10 coats of lacquer were applied over three days with my new spray gun. For the previous four stringed instruments I used spay cans of lacquer but for this guitar I decided to get a spray gun and try it out. By my quick calculations, the gun should pay for itself over the course of just a couple of guitars (that is if you already have an air compressor).
My spray set up consists of a spray booth that exhausts to the outside and a "door jamb" style spray gun. This gun is powered by a 5 horse compressor in the next room that feeds its pressure line "up hill" to a water trap. The "up hill" run allows condensated water to drain back to the compressor and the water trap is extra insurance. A coiled pressure line runs to a quick connector that attaches to the gun and the gun hangs on a screw when not in use. I found that around 20 psi worked well for the cut shellac and 25 psi was good for the uncut lacquer. More pressure resulted in more over-spray and a pebbled finish. The liquid feed was opened up to make an oval spray pattern. The gun was easy to clean and did not require cleaning between coats but only at the end of production. Here is the set up.
Now to let is sit for a couple of weeks while the lacquer cures...
These are a series of articles detailing projects that I've built. Click on the Blog Archive arrows to expand the months and see more articles that posted here...
Sunday, July 8, 2012
Friday, June 29, 2012
Misc. Guitar Projects
It's amazing how much you can get done when you don't feel like finishing another project. I am to the point of shaping the block that will hold the finger rest onto the archtop guitar but I don't feel like doing this so I've completed two small projects that I've had on the back burner for many months...
The first is a really simple one. When you are working on a guitar while you are sitting, it is hard to see the LCD displays on small hand held metronomes and tuners. These easy to make plexiglass holders work great for propping the device up so you can see the display. Small sections of plexiglass were cut out and held in a vice while a heat gun was used to apply heat to the areas that need to be bent. The heat gun does a great job of getting the plexiglass just hot enough to bend but not so hot that it forms air bubbles in the plastic. These are quick and easy to make and are great presents for anyone who uses these common devices.
The other project was one that is aimed at making it easier to power up my studio set-up and at the same time save my monitor speakers from the power-up pops that occur if they are not the last thing turned on in the power up cycle.
This is a small box made of poplar that has the rack that I built for my mixer glued to its top. The bottom of the box comes off to access the inside. Two 120v 15A LED indicator light switches are mounted on the front and wired up to an outlets in the back. The mixer, guitar pedals and anything else are plugged into one power strip that is connected to the outlet wired to the switch on the left. The monitor speakers are plugged into a power strip that is plugged into the outlet connected to the switch on the right. The connection tab that normally joins the two outlets for wiring has been removed so they can function independently of each other. These switches are wired in such a way that the LED's come on when they are in the "on" position.
With this set up I can flip the switch on the left and wait a few seconds while all of the equipment powers up and then switch on the speakers. When I am done, I just reverse the process and switch off the speakers before powering down everything else. This way I can power everything up and down from one convenient location. A little cork on the bottom of the box keeps everything from sliding around on the "Strat-o-table."
The first is a really simple one. When you are working on a guitar while you are sitting, it is hard to see the LCD displays on small hand held metronomes and tuners. These easy to make plexiglass holders work great for propping the device up so you can see the display. Small sections of plexiglass were cut out and held in a vice while a heat gun was used to apply heat to the areas that need to be bent. The heat gun does a great job of getting the plexiglass just hot enough to bend but not so hot that it forms air bubbles in the plastic. These are quick and easy to make and are great presents for anyone who uses these common devices.
The other project was one that is aimed at making it easier to power up my studio set-up and at the same time save my monitor speakers from the power-up pops that occur if they are not the last thing turned on in the power up cycle.
This is a small box made of poplar that has the rack that I built for my mixer glued to its top. The bottom of the box comes off to access the inside. Two 120v 15A LED indicator light switches are mounted on the front and wired up to an outlets in the back. The mixer, guitar pedals and anything else are plugged into one power strip that is connected to the outlet wired to the switch on the left. The monitor speakers are plugged into a power strip that is plugged into the outlet connected to the switch on the right. The connection tab that normally joins the two outlets for wiring has been removed so they can function independently of each other. These switches are wired in such a way that the LED's come on when they are in the "on" position.
With this set up I can flip the switch on the left and wait a few seconds while all of the equipment powers up and then switch on the speakers. When I am done, I just reverse the process and switch off the speakers before powering down everything else. This way I can power everything up and down from one convenient location. A little cork on the bottom of the box keeps everything from sliding around on the "Strat-o-table."
Now I can get back to the archtop...
Thursday, June 21, 2012
Archtop Guitar Build - Tail Piece
The more I thought about putting the final coats of finish on the guitar, the more I thought that this is a bad idea seeing that the finger rest, pickup, tail piece and bridge are not built yet. If I finished the guitar I was taking a chance that one of these pieces would have problems, not fit correctly and something would need to be done to the front plate that would require redoing the finish.
The tail piece is made from ebony and I had to wait a while to find a piece on e-bay that was big enough to make both the tail piece and finger rest. I looked around at different designs and really liked the tail piece design that McCarthy guitars uses. Instead of having the strings sit through the tail piece in slots, they run their strings through holes bored into the front end of the tail piece.
A 12 inch radius was cut into the top of the tail piece and holes were bored for the strings. Corresponding holes were bored for the ends of the strings and channels were cut into the top to allow for easier passage of the strings. I made mother of pearl inlays that match up in design and form to the fret markers. The back of the tail piece had holes bored for the tail strap and channels were routed to accept the retaining nuts for the tail strap. A channel was cut into the back and a fulcrum of ebony was installed. I also made side bevels to make the tail piece look less "bulky". I also used some color-tone black dye in water to make the ebony a uniform black. Here is the end result with a couple of scrap strings in place to aid in checking the angle for the finger rest.
The tail piece is made from ebony and I had to wait a while to find a piece on e-bay that was big enough to make both the tail piece and finger rest. I looked around at different designs and really liked the tail piece design that McCarthy guitars uses. Instead of having the strings sit through the tail piece in slots, they run their strings through holes bored into the front end of the tail piece.
A 12 inch radius was cut into the top of the tail piece and holes were bored for the strings. Corresponding holes were bored for the ends of the strings and channels were cut into the top to allow for easier passage of the strings. I made mother of pearl inlays that match up in design and form to the fret markers. The back of the tail piece had holes bored for the tail strap and channels were routed to accept the retaining nuts for the tail strap. A channel was cut into the back and a fulcrum of ebony was installed. I also made side bevels to make the tail piece look less "bulky". I also used some color-tone black dye in water to make the ebony a uniform black. Here is the end result with a couple of scrap strings in place to aid in checking the angle for the finger rest.
Sunday, June 10, 2012
Archtop Guitar Build - Finishing Part 1
Finishing is a tedious but very important part of any project. The guitar was gone over with a fine tooth comb to look of for any imperfections. Any small gaps in the binding were filled with paste made from binding chips dissolved in acetone. Small gaps in the wood were filled with Elmers glue and the wood was sanded to create dust which combines with the glue to form a custom paste that erases the gaps. The bindings were scrapped and the guitar was gone over with 220 grit sand paper.
The guitar received a coat of thinned shellac and this sealed the wood and pointed out any areas where glue or other substances prevented the shellac from sealing the wood. These imperfections were repaired and the process was repeated. I liked the tone of the spruce with just the shellac on it and it should remain pretty close to this tone with the clear lacquer applied over it so this should be good to go. I will make a alcohol based dye to tone up the maple to make more contrast between it and the spruce top.
Tuesday, June 5, 2012
Archtop Guitar Build - The Big Glue-Up
I have to admit that this is the part that I've been dreading, the final glue-up of the neck to the body. For me the choice of glues was easy to make, hide glue. This glue is very strong, acoustically dense and can be reactivated with heat and steam so if the neck should ever need to be re-set, it can be steamed off fairly easily. The problem is that the dove tail joint is very tight. You have to use both thumbs and bulge your eyes out to get it to move from the seated position once the neck is in place. This is great because it should lead to a very strong joint. The problem is that hide glue is mostly water and water makes wood swell and lots of water makes wood swell a lot. If the joint is tight dry, it will be uber tight wet and it is possible that once the glue is in place, the joint will get stuck half way or even worse about 90% of the way in. To make matters even worse, hide glue gets really sticky as it cools so from the moment the glue is applied it is cooling and swelling the wood, both very bad in terms of getting the joint together. Hide glue is known to have very little "creep" to it. Creep is what you get when you put two flat pieces of wood together in a butt joint and put wood glue between them. When you first bring the pieces together and put pressure on them, they want to skate around on top of each other because the glue initially acts as a kind of lubricant in the joint. Hide glue is very tacky as it sets so once you put the pieces together, they don't want to move so you had better be accurate with your initial set up of the joint.
The solution to this is to heat the wood to be joined to increase the time the hide glue stays hot. Also, you must be sure that the hide glue has been in the glue pot long enough to get uniformly hot. I heated both sides of the joint with a hair drier to get the wood warm and also made sure that all of the clamps and cauls were set and ready to go. I applied the glue to the joint and to my surprise the whole glue up was very anti-climatic. The joint slid together easier than when dry and seated easily. The clamps were applied and I wondered why that went so well? I think the answer is that when hot and wet, hide glue feels a lot like, well um snot. That is because it is mostly animal protein and long chain lipids sort of like, well you know... I must have kept the joint hot enough so that no setting took place before the joint was seated so the whole thing went together easily. Here is a photo of the glue up.
Sunday, June 3, 2012
Archtop Guitar Build - Headstock and Neck
Shaping the neck looks intimidating but it really isn't (overall, this is the fourth neck I've shaped). Every make of guitar has a little different feel to it's neck. Some are wider or narrower, some have a round profile while others are more oval or even "V" shaped. One of the beauties of building your own guitar is that you can make the neck just the way you like it. My favorite neck as far a feel is concerned is my Laravee acoustic so that is the neck that I copied. Cut the profile to match and rough in the shape. I used a spindle sander but you could use a spokeshave, plane, belt sander or whatever you have handy. Be careful not to overdo the rough shaping since it is a lot easier to remove wood than it is to add it. I find that a pattern guide is handy to get the shape to match exactly. I used a random orbit sander for the fine tuning the shape. How the neck feels in your hands is the final quality assurance step.
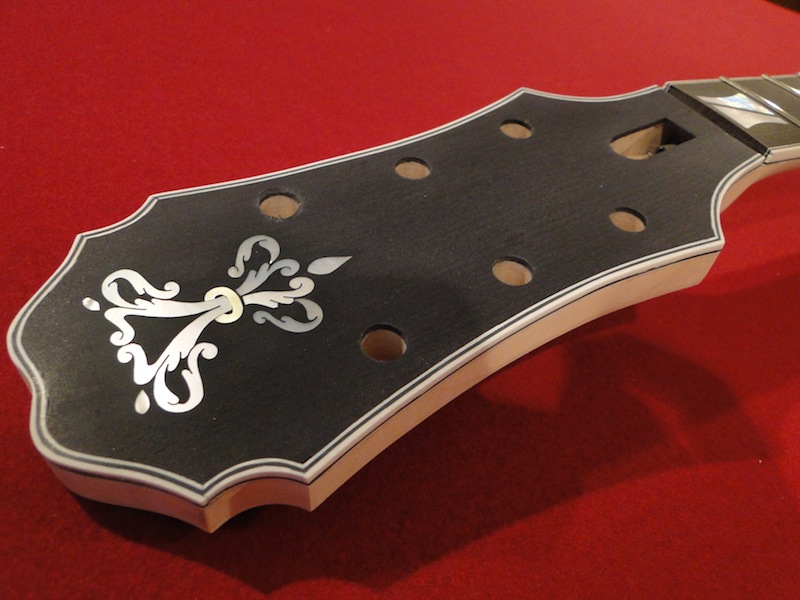
I then routed the channel for the headstock binding and installed the plastic bindings. I usually install each layer of binding individually and build up the layers one by one. The advantage of this is that you can use butt joints instead of cutting miters. This time I tried laminating the thin .020 black and white together to make the installation easier but the miters were a bear and ended up making the process take a lot longer than if I had done it the way I always do. I used butt joints on the outermost layer of .040 while with .020 black and white on the bottom (this was a one piece build-up).
The headstock mother of pearl inlay was laid out and cut. The detail of the inlay required having the black epoxy seep through to fill the fine cuts in the design. I routed this a little later at night than I usually like to work (because bad things happen when you are overly tired) and I was a little sloppy in some of my cuts but the black epoxy covers over a multitude of minor errors. The piece was loaded with epoxy and a level was used to insure the headstock was flat because the thin epoxy will self level, even through cracks only a few thousandths of an inch wide.
Here is the end result of the headstock inlay and binding process.
One other thing that I should point out is that I changed the geometry of the nut slot from what the plans call for. Benedetto likes to run this fingerboard and headstock binding as one continuous line. I think this looks great but the way he does it is by having the bottom of the nut slot run at an angle that matches the headstock angle. This means that the bottom of the nut has to be cut at an angle to match the headstock angle. I would really rather have my nut sit in a perfectly flat and square slot. This will make fitting easier and could improve the guitar's tone because the nut/neck interface is an important part of transfer of string vibrations to the guitar itself. I made my flat of the neck (for the fingerboard) a little longer and used four layers of black veneer to make the top of the headstock hit the nut in such a way that the binding material for the headstock can be wide enough to visually match the fingerboard binding. You can sort of see that in this photo of the finished neck.
It is now time for the final fitting of the neck to the body. A piece of carbon paper with a strip of blue masking tape on the back for reinforcement was used to mark the high spots on the back of the neck extension. These high spots were removed with a scraper and the process was repeated about twenty times until a uniform dusting of black was seen across the joint.
This is one point that I'd like to make for anyone building an archtop. The landing area for the neck extension is something that you need to think about early in your build. When you make your templates for the top plate, make sure that you leave a perfectly flat landing area for the headstock extension. This will make the fitting of the extension much easier when the time comes. I sure wish I had done that...
I then routed the channel for the headstock binding and installed the plastic bindings. I usually install each layer of binding individually and build up the layers one by one. The advantage of this is that you can use butt joints instead of cutting miters. This time I tried laminating the thin .020 black and white together to make the installation easier but the miters were a bear and ended up making the process take a lot longer than if I had done it the way I always do. I used butt joints on the outermost layer of .040 while with .020 black and white on the bottom (this was a one piece build-up).
The headstock mother of pearl inlay was laid out and cut. The detail of the inlay required having the black epoxy seep through to fill the fine cuts in the design. I routed this a little later at night than I usually like to work (because bad things happen when you are overly tired) and I was a little sloppy in some of my cuts but the black epoxy covers over a multitude of minor errors. The piece was loaded with epoxy and a level was used to insure the headstock was flat because the thin epoxy will self level, even through cracks only a few thousandths of an inch wide.
Here is the end result of the headstock inlay and binding process.
One other thing that I should point out is that I changed the geometry of the nut slot from what the plans call for. Benedetto likes to run this fingerboard and headstock binding as one continuous line. I think this looks great but the way he does it is by having the bottom of the nut slot run at an angle that matches the headstock angle. This means that the bottom of the nut has to be cut at an angle to match the headstock angle. I would really rather have my nut sit in a perfectly flat and square slot. This will make fitting easier and could improve the guitar's tone because the nut/neck interface is an important part of transfer of string vibrations to the guitar itself. I made my flat of the neck (for the fingerboard) a little longer and used four layers of black veneer to make the top of the headstock hit the nut in such a way that the binding material for the headstock can be wide enough to visually match the fingerboard binding. You can sort of see that in this photo of the finished neck.
This is one point that I'd like to make for anyone building an archtop. The landing area for the neck extension is something that you need to think about early in your build. When you make your templates for the top plate, make sure that you leave a perfectly flat landing area for the headstock extension. This will make the fitting of the extension much easier when the time comes. I sure wish I had done that...
Tuesday, May 29, 2012
Archtop Guitar Build - Fret and Neck Work
I left the neck as a solid block because it would make support for seating the frets very easy. I usually seat my frets with a dead blow hammer but I got a fret press with 12 inch radius insert from Bob when I bought the radius beam. Wow, what a nice tool! The frets seated well and easily but the fret press really shined in the area over the neck extension. Just shim up a support and gently press the frets into place.
Now that I don't need the support of the neck block, I trimmed the neck to shape, added the extension for the nut channel as well as ears for the headstock. We're getting close now...
Subscribe to:
Posts (Atom)