Showing posts with label Shellac. Show all posts

Sunday, July 8, 2012

Archtop Guitar - Finger Rest / Finishing part 2

The finger rest was easy enough to make but very hard to fit to the guitar.  The plans call for the guitar neck to have a set back angle and have the strings sit a predetermined height above the top plate at the position of the bridge (between the two central points of the "f-holes."  I made sure of this when I made the neck but one thing that I did not take into account was the thickness of the neck where the finger rest attaches.  This has to be thick enough to accept the mounting screws but also has to be high enough so that you can get a screwdriver in to seat the screws.  Lastly the finger rest has to hold a pick up at just the right distance from the strings.  I made a small wedge for the pickup to mount on and checked all of the distances.  All of my geometry was spot on but I was a little too tight to the top plate to get a screwdriver in.  This is why I took a few weeks away from the project to think this one over since no solution came to mind right away.

To further make the matter more difficult, the finger rest sits parallel to the strings but must sit low enough so that it doesn't interfere with playing, yet sit high enough so that you can use it as a "rest" for picking.  Lastly the finger rest does not sit on the same plane and the strings but is canted down from the strings across the body of the guitar. 

I made the finger rest out of ebony, with a mother of pearl inlay that goes well with the fret markers and tail piece inlays. I mounted a couple of tuners to the head stock and the tail piece and bridge so that I could string up low and high E strings to get the geometry for the finger rest.  I then made an ebony block that would attach to the bottom of the finger rest and mount the assembly to the side of the neck.  Two holes were drilled into the mounting block and corresponding holes were bored into the neck.  To get around the low placement I used allen head screws.  These allowed me to use a small allen head wrench that fit perfectly into the space provided and made for a very nice fit.  Problem solved!

Next I did something that you are not supposed to do.  I strung up the guitar with all of the strings and played it for a day.  The action was surprisingly good considering I did no set up work and the  guitar sounded great acoustically but I quickly found that the neck was too chunky and "square" from frets 4 to the nut.  This is something that I did not appreciate when I was forming the neck but when I re-checked with a pattern guide, there was a subtle difference in neck geomertry between the Laravee neck and the archtop.  They say you should not play the guitar because you will get oils into the finish that may prevent the lacquer from properly bonding but I was planning on applying more layers of shellac so I knew this would not be an issue.  I am very glad I did this because I would not have been happy with the neck otherwise and I learned that for a beginner like me, there is a difference between feeling the neck without strings and playing it.

This is the finger rest.  The hole is for the volume pot and the slight depression in the back is to allow the screw head clearance when inserted.


Next I cleaned the guitar and sprayed several coats of shellac, especially on the neck because it had need sanded bare in the areas that were re-worked.  Any small imperfections were repaired and 10 coats of lacquer were applied over three days with my new spray gun.  For the previous four stringed instruments I used spay cans of lacquer but for this guitar I decided to get a spray gun and try it out.  By my quick calculations, the gun should pay for itself over the course of just a couple of guitars (that is if you already have an air compressor). 

My spray set up consists of a spray booth that exhausts to the outside and a "door jamb" style spray gun.  This gun is powered by a 5 horse compressor in the next room that feeds its pressure line "up hill" to a water trap.  The "up hill" run allows condensated water to drain back to the compressor and the water trap is extra insurance.  A coiled pressure line runs to a quick connector that attaches to the gun and the gun hangs on a screw when not in use.  I found that around 20 psi worked well for the cut shellac and 25 psi was good for the uncut lacquer.  More pressure resulted in more over-spray and a pebbled finish.  The liquid feed was opened up to make an oval spray pattern.  The gun was easy to clean and did not require cleaning between coats but only at the end of production.   Here is the set up.

Now to let is sit for a couple of weeks while the lacquer cures...

Friday, May 20, 2011

HMS Triton Frigate Cross Section Build Log - Conclusion

Here are the final photos of the completed model, I hope that you enjoyed following along with the steps of its construction.  This model received a Gold Award at the Midwest Model Ships and Boats Competition.


Thursday, May 19, 2011

Folding wooden book stand

This is this year's birthday present for my wife.  She likes to do her Bible study at the table and I've noticed that she tends to prop up her Bible when she is studying so I designed and built this for her birthday.   Because is fold up it can be taken with her wherever she goes.

The stand is made of maple and the wooden hinges were made with individual pieces since I don't have a drill with the length to make a single pass for drilling the hole for the brass hinge pins.  The finish is shellac that has been buffed with 0000 steel wool for a fine matte finish.


Friday, January 7, 2011

Scratch Built 1:12 Peterboro Canoe Conclusion

The hull is now surprisingly strong for its light weight and will get even stronger once the internal frames are added. Start by milling strips that are 1/16 by 1/32 inch in cross section. 


These are soaked and bent over the approximate strongback frames. This will prevent them from kinking when inserted into the hull.


They are placed into the hull while damp and thin CA is used to glue them in place.


A strip of plastic works as a spacer and the frames are glued into place the whole length of the hull.


Once all are in place, trim the ends and sand flush with the sheer plank. 


Thwarts of cherry were used on this model. I have a jig for making the decorative bevels in these thwarts or a rounded file can be used instead.


The frames are marked where the thwarts are to be installed and a section of the frame is removed and the thwart is glued in place.


Floor boards are milled from a contrasting colored wood (cherry in this case). Since I build many of these canoes, I have a jig for getting the proper rounding of the floor board ends.


The floor boards are glued into place and the interior of the hull is finished off. A coating of thin CA can be used over the entire interior surface to even out the tones wood finish.


The kit comes with deck boards that are undersized in my opinion. I make replacements that are oversized so that an even overlap can be made in both the cap rail and decks.


Three short segments of strip are used to finish off the planking of the stem and stern and a gentle curve is carved and sanded into these strips. The stem and stern pieces are trimmed down and a crown is made into the tops of these.


The decks are glued in place with a slight separation between the deck pieces at the far ends of these. This will be covered by a cap on top and a false keel at the ends.


As can be seen in this photo, there is plenty of excess material for forming the overhang on the hull. 


Cap rails are cut and installed between the ends of the decks.


The interface between the cap rails and the decks are cleaned up and a gentle camber is sanded into the tops of the decks.


An even overhang is shaped in the cap rails and decks.


Deck caps are installed and trimmed to size.

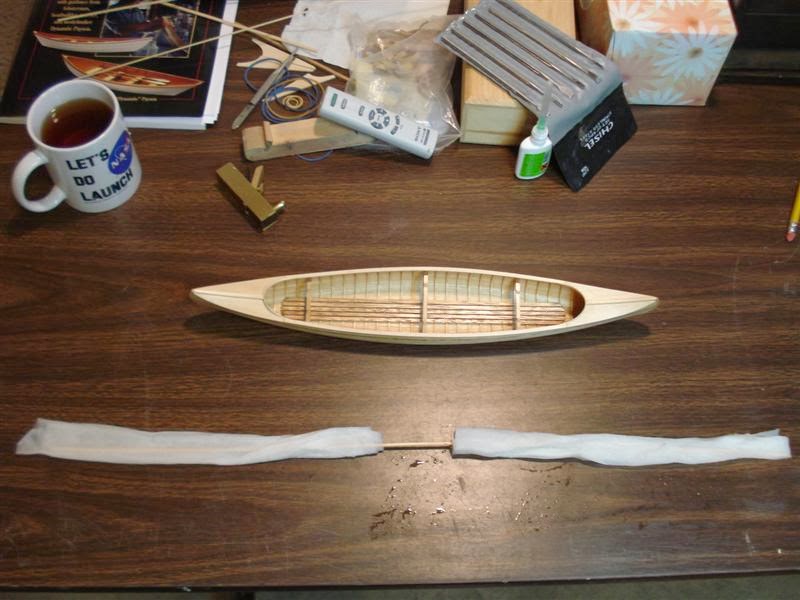
Here is a very effective method for soaking wood that works well if you don’t want to get a large container out to hold the planks. If the wood is very stiff and doesn't want to bend well, the water soaked plank/paper towel assembly can be micro-waved to steam the wood. I've used this technique several time with uniformly good success.


The false keel is bent to shape and installed onto the hull using rubber bands attached to the thwarts to hold it in place while the glue dries. 


The cockpit combings are formed using a bending jig made of MDF and then are installed into place.


Trim and profile the combings once they are attached to the canoe. 


Paddles can be made to accent the canoe display. For this particular canoe I chose traditional otter tail paddles. First find a pattern that you like and size the paddles to an appropriate length. In this case they end up being around 5 inches long. The various stages of production are shown here.


Make a pattern and trace out on basswood, cut out using a new and sharp knife. Use a plane or other tool to thin out the blade of the paddle.

Since I turn out the shafts on a drill press I carve a round section to insert into the drill press chuck. Turn the shaft.


Finish off the hand grip and smooth off the interfaces between the handle, shaft and blade.


 Here is a photo of the completed canoes. The one in front has mahogany trim and the one in back cherry. The presentation plate has been placed on the first canoe while the second is still awaiting a suitable event for presentation. I hope that you've enjoyed following along.

Thursday, December 30, 2010

Wooden Bookmarks

Here is a quick and simple project that makes good use of leftover lumber.  Take a piece of scrap wood and profile it to the size of bookmark that you would like to make.  Make a curved cut through the piece and glue a thin strip of a contrasting color of wood between the two pieces.  Once this has dried, make another curved cut through the block and piece together more contrasting woods.  The resulting block can be cleaned up and then cut into individual bookmarks.  Finish with shellac and you should get many bookmarks from each blank.. These make excellent presents and take little time and materials to make.

Tuesday, December 7, 2010

Fender Headstock Tables

*** If you like these tables, be sure to check out my website at www.semillerguitars.com ***

These are a couple of tables that I made earlier this year. The tops are made from maple boards that are held together with dowels.  The color of the boards was not an exact match for a vintage stratocaster headstock so I bleached the boards to make them white and then used tinted shellac to make them look just right.  I used A/B wood bleach to do this.  The A part (Sodium Hydroxide) is applied to the wood and allowed to sit for 5-10 minutes. While the wood is still wet, the B part (Hydrogen Peroxide) is applied and allowed to sit for as long as wanted (or till dry). The box said let stand over night but the books that I read said to neutralize with dilute white vinegar so this is what I did. The photo below shows the untreated table on the left and the treated on the right. I should mention that the table on the left has less variation in tones between the pieced together maple boards than the one that was bleached, so the results are even more dramatic than the photo shows. 

The legs for the tables were turned from maple and held in place with screw on under table mounts.  The Fender and tuner decals were printed on white ink jet decal paper and covered with clear acrylic spray.   The remaining decals were printed on clear decal paper and likewise sealed.  The decals and shellac were protected with General Finishes Arm-R-Seal to make them water resistant and they looked like this when finished.