The Stew Mac site also said that highly figured woods are difficult to bend because they want to crack on the flames, just what my practice pieces did. They suggested lightly wetting the wood with a brush and using more heat and less water to make the bend. I was paranoid enough to try this and it worked for the sharp bends of the cutaway but it took forever to get done. I really babied the wood, used a backing piece of thin metal as a support and what usually would take me 15 minutes took well over an hour. For the side with just the recurves I went back to my usual 30 minute water soak and the process took about 15 minutes to get done. The gentle curves didn't scare me like the cutaway did and I might have gotten away with it but I didn't want to chance it. The sides were clamped in the mold and "cooked" with my halogen spots just like the uke sides detailed in a previous build on this blog.


The "f-holes" were lined with plastic bindings.. These will help support the fragile scallops, cover the end grain and add beauty to the finished guitar. I used two layers of .020 white and black binding covered by a .040 white on the inside. Each layer is made up of four pieces. I started with the pieces that go around the round holes. The round profile was pre-bent using a dowel so that there were no kinks in the binding. I used thick CA glue for the piece that butts up to the wood and thin CA for the other layers. The thick CA doesn't get sucked up into the end grain of the wood and the thin CA is really easy to work with for plastic-plastic joints. I used butt joints rather than the 45 degree miters described in the book. I have found from other plastic binding projects that is is very difficult to spot the butt joints on the finished project. One other point is that the edges of the "f-holes" lie at different elevations on the front plate. Because the edges of the "f-hole" are parallel to the guitar sides,you need fairly thick binding material to be sure to have enough depth to cover the entire hole profile. In my case 1/4 inch width binding material did the trick. Because I am cautious, I did the binding prior to setting the final thickness of the top plate. This way if something happened during binding the "f-holes" I could compensate by taking material off of either the top or bottom of the plate.
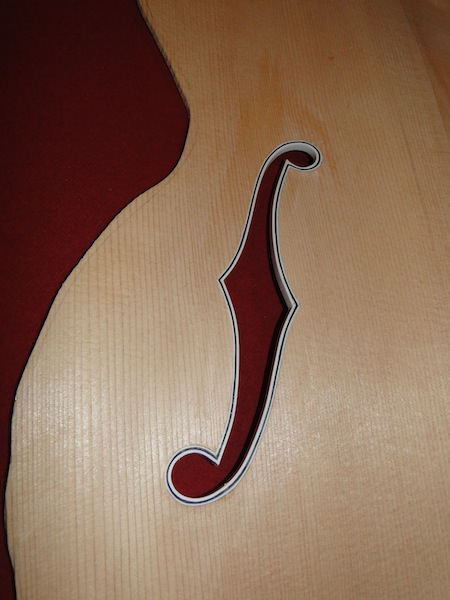

The F holes look great - good work! My experience with bending curly or flamed maple is just like yours. The mahogany I bent, after boiling the sides for 15 minutes each, went like butter. Nice smooth curves, right on the money. I clamped them in the mold and put each set overnight next to the wood strove, which dried them out and "set them nicely. Hardly any spring back.
ReplyDeleteI thought I'd have no problem at all with using 3/64ths strips of curly maple (alternated with a similar size of mahogany) for the bindings on the body and headstock, but I was really surprised. Soaking just sort of melted the wood, making it pasty and impossible to work with. So I ended up bending the strips dry, dampening the side against the iron with a sponge occasionally. the tight curve along the headstock took a full day to get right, and I cracked 4 pieces for every one I installed.
I found that the key to bending the figured maple was to support the top side with some thin metal so that no one area took all of the stress from the bend and caused a crack. Also a lot of heat helps.
ReplyDeleteWhat router bit and guide did you use? I have looking at one on Stewmac for a while, but maybe you could help me in my search for what tools I need to complete the job on a semi hollow body electric I am making.
ReplyDeleteI have a Dremel tool that I plan to use, so any help on the two other components would be appreciated! You did a great job on your binding!
I am not sure I understand your question. The "f-holes" were cut as per the post and the binding does not have a route but sits flush on the inside face.
ReplyDeleteAs far as binding the body of the guitar, I've used a dremel with a home made jig to hold the sides off of the bit (I used a spiral cut bit for this) and the Stew Mac version with the Colt router and standard bit. Of the two, the Stew Mac version is much more expensive but does a much more reliable job as per the disaster strikes post.
Thanks! Yeah I was looking to see what you used for a jig and bit. Stewmac is expensive, but I too find that you pay for what you get by not worrying about screwing something up.
ReplyDeleteThanks for your reply and I think your blog is great! Keep up the good work